Arduino Servo Project #1
Pulse Width Modulation - Please note that on the Arduino digital pin side you will see some of the pins with squiggle or wavey line. This indicates PWM or Pulse Width Mudulation. This means this data pin can send and recieve mudulated or variable data/current from the sensor that you are attaching. Not just On and Off signals. A servo needs to be on a PWM pin hole because it uses modulated current/data/frequency.
Arduino Simple Servo #2
Follow the slides below to code a servo to move from 0 to 180 degrees and back. Then apply that skill with art or design to create something unique.
The Boat
|
|
Construct a boat using cardboard, duct tape or other tape and glue. Cover the bottom with tape to keep out the water. The sides should be 6 inches long and 2 1/2 inches tall. The bottom is approximately 6 1/2 inches long by 3 inches wide. Remember that the bottom is longer because it becomes the tip or front of the boat. See picture 2 & 3. Place the Arduino inside when done. Attach the Servo motor with glue or tape. Don't forget to create the paddle with a piece of popsicle stick and a paper clip. Glue the paper clip to the Servo motor. Then adjust the code so that it rotates correctly and at the right speed.
|
Use the skills and code you learned from the instructions above to create animatronic creations like the ones shown below.
|
|
|
Arduino Servo Project #3 - With Potentiometer Control
Arduino Servo Project #4 - Control 2 Servos with 2 Knobs.
Arduino Servo Project #5 - Centering your Servo to 90 degrees.
This activity will be important to do and understand before you begin your work on the Crawling Robot. Later you will need to know how to center your servo to 90 degrees in order for the Crawler to work properly. You will refer back to this activity later. Try it out so you understand.
Servo With Button #6 - Using a button to Control a Servo ( If Else conditional statements)
In this activity you can program a button to control the movement of a servo when the button is pushed. This program uses conditional statements that tell the servo IF the button is "off" or "LOW" then do something, Else (otherwise) do something else. You could create a project where the button controls the servo opening a lid or door.
Using the skills and knowledge gained from the servo activities below are some projects that you can attempt.
The Crawling Robot (Engineering Design Process) Prototyping, Iteration, Revision

In this project you will build a Crawling Robot. You will need to build your base so that it looks like the example. In our project we used a 3D printer to build the base. Please refer to the files below for parts list and .stl file to print out your base on a 3D printer. You can build your base out of any material, however it should be rigid. Also note that the ends of the base are at angles approx. (25-30 degrees).
|
For 3D Printer
| ||
Parts PhotosMost parts were purchased through Amazon.com. Battery can be purchased at better prices through hobbyking.com. After you assemble the parts, hold down all component with a strong rubber band.
Fritzing Wiring SketchSpecial Note: In this sketch, the battery is a 1000mAh 3.7v battery. This is not enough to power the both servos and the Arduino board. It is better to use a small 7.4 v 2S 500Ah or 850mAh or 11.1v 2S or 3S Lipo Battery.
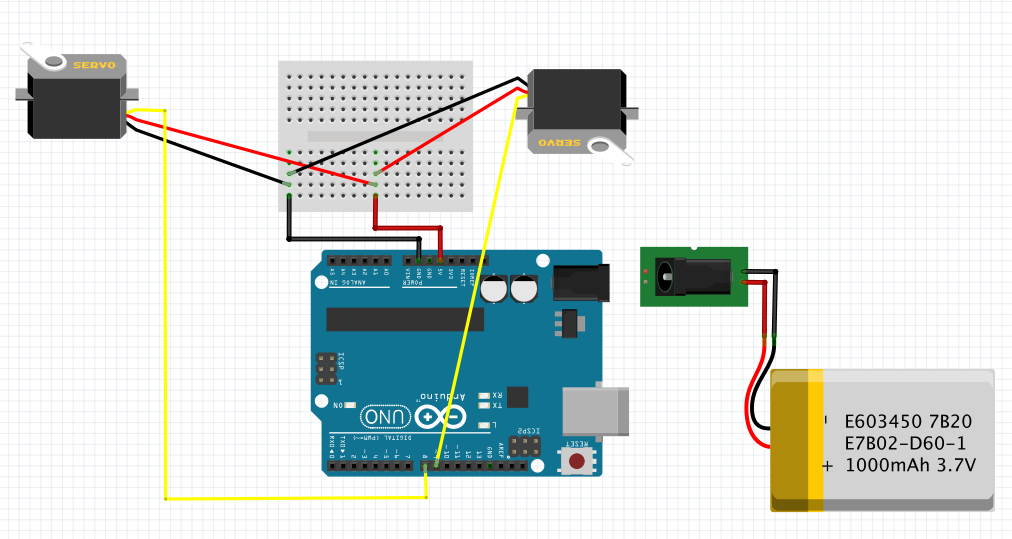
Comment: This project proved to be very successful considering it was our first iteration of the 2 servo crawling robot. We had good success using a 7.4 LiPO purchased through Amazon. I am currently debating whether to go with Hobby King. I have bought LiPo batteries from them before. I recommend using the 7.4v rather than the 11.1v
Adjusting Leg Movements - Think about angles in a protractor.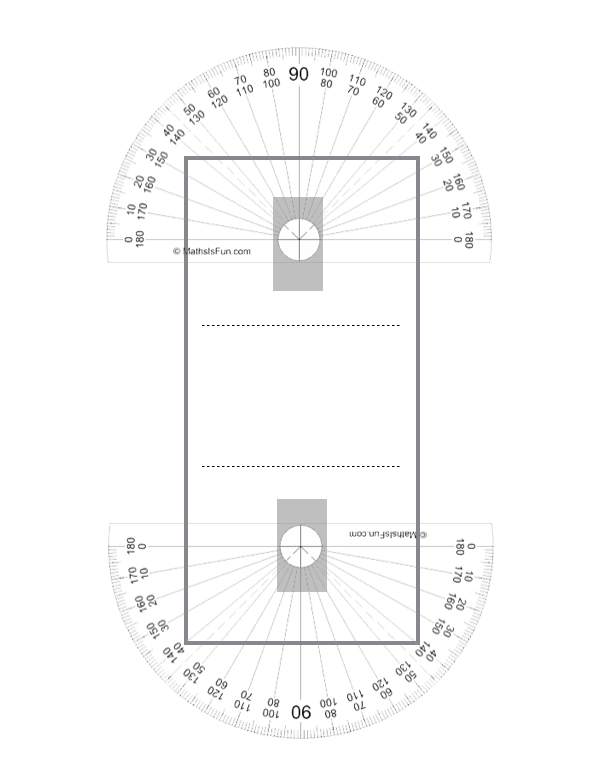
|
Parts List
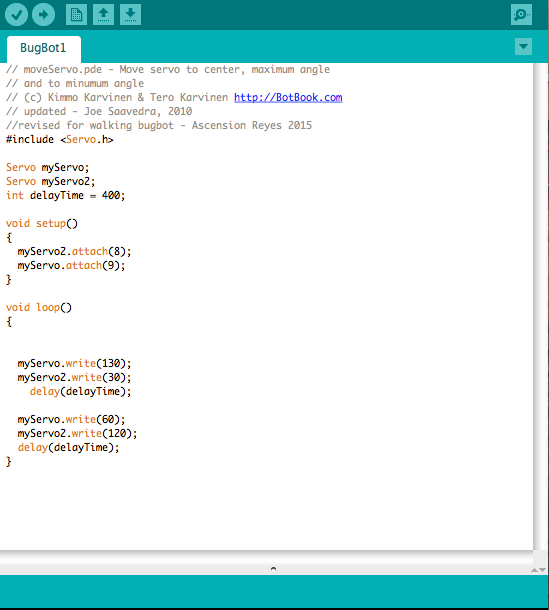
Code for Crawling RobotCode should be adjusted for best angles. Do several trial runs and then adjust for angle and speed. See Diagram Below that contains protractors.
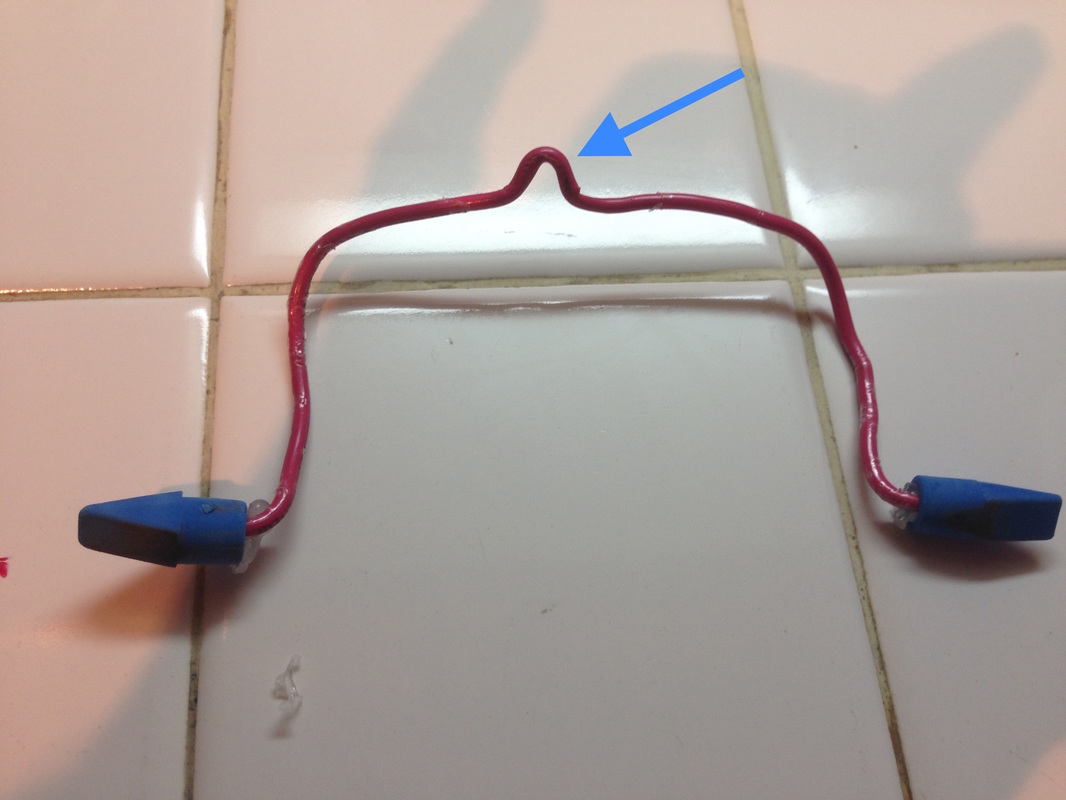
LegsWhen preparing your legs, be sure you bend a small arc as shown below. This will help prevent the legs from moving too much after you glue them the star bracket on the servo.
(I will be experimenting this summer on a rigid leg example using non-flexible material. This may prove to be a better design or not.)
|
Robotic Arm #1
View the video of the simple robotic arm. Attempt to replicate it. Revise the design to improve it. Then demonstrate it. Have your peers critique it and then revise it again. All the skills learned in the Arduino Servo section are applied in this projects. If you have a 3D printer, use the 3D printer on your 2nd or 3rd iteration to improve the arm.

|
|
Robotic Claw or Hand #2
In this project, use the Servo with Button program to activate a claw or arm. Improve the design by using different materials. The goal will be to be able to grasp several different types of objects. In the example a 3D printer was used to print up student designed fingers, but you can use just about anything your imagination leads you to.

Math

|
Geometry
Angles Milliamps (units of measure) Compound addition Compound subtraction |
Science

|
Motion, speed
Friction Energy Animal locomotion |
Technology

|
Servos
Write command Attach command Pulse Width Modulation PWM Conditional Statements 3D Printing Engineering Process Model |
